Welcome To The Dark Side
Last month, my friend Ken asked if it was possible for me to make him an Emperor Palpatine robe for an upcoming video shoot. I agreed and started researching possible ideas for patterns online… There were a lot of them!
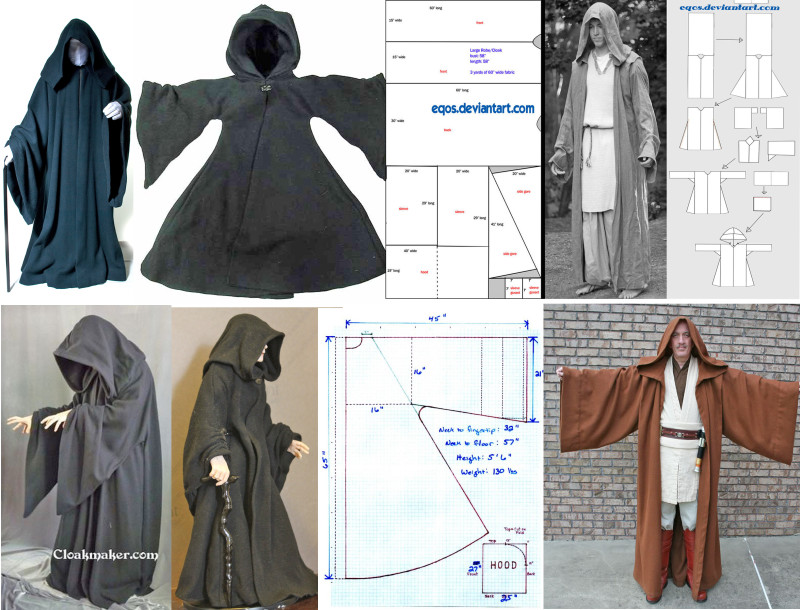
Next, I ventured to the fabric store and found an inexpensive ($4/m), medium weight weave in the Bargain Bin – and I bought the rest of the bolt (just under 6m/6.5y worth). Based on that, and the fact that it was a generous 150cm (58″) wide, I decided that the Rebel Legion’s pattern was a good place to start. The general idea was sound, but I found it very confusing, so I made a few alterations…
The biggest changes were: cutting the body and arms out separately, using the total length of the robe (width of the fabric) to dictate how to curve the hem, using my Serger instead of bothering with French seams, using a bowl to cut out a good neckline, making a double-hood (so that it would have a more weighted look and no ugly seams), using bias tape to cover up the neck seams, and making tiny pleats in the lower part of the arms (vs. a big one near the shoulders for the Jedi robe)…
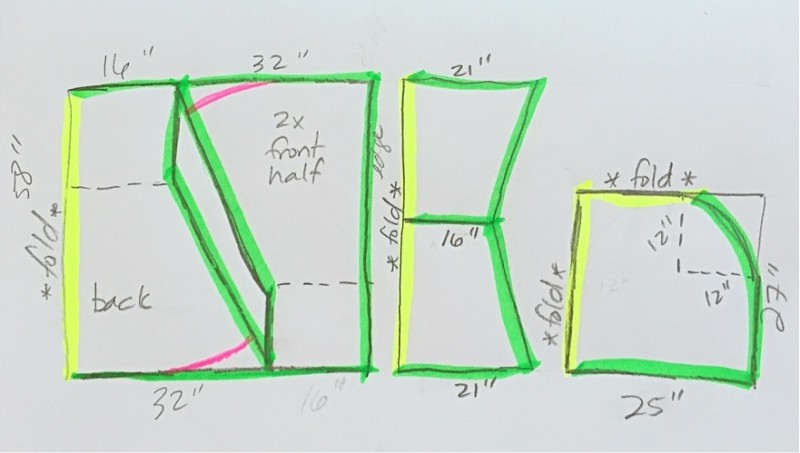
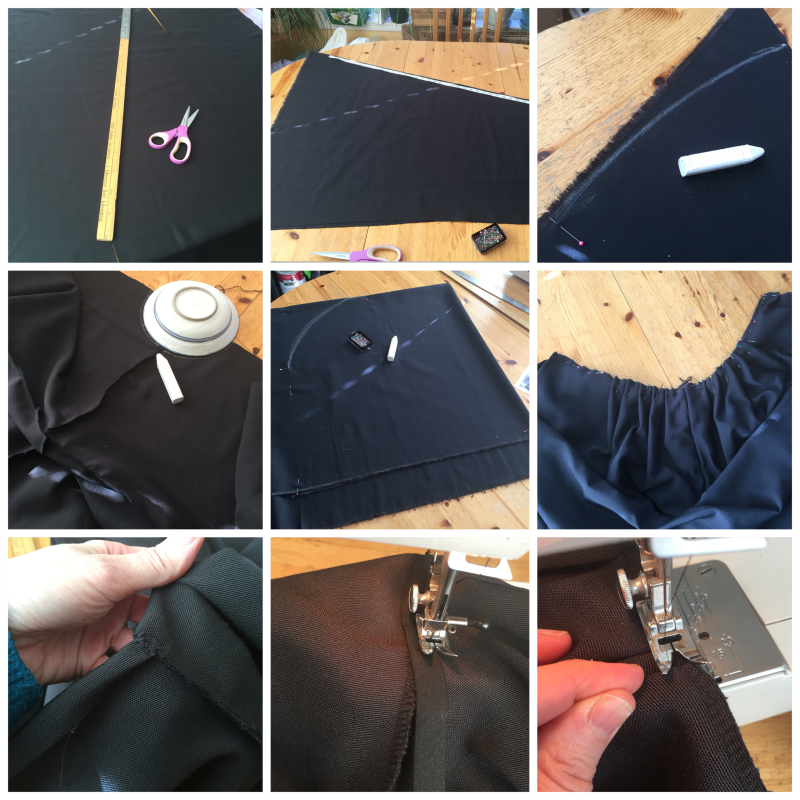
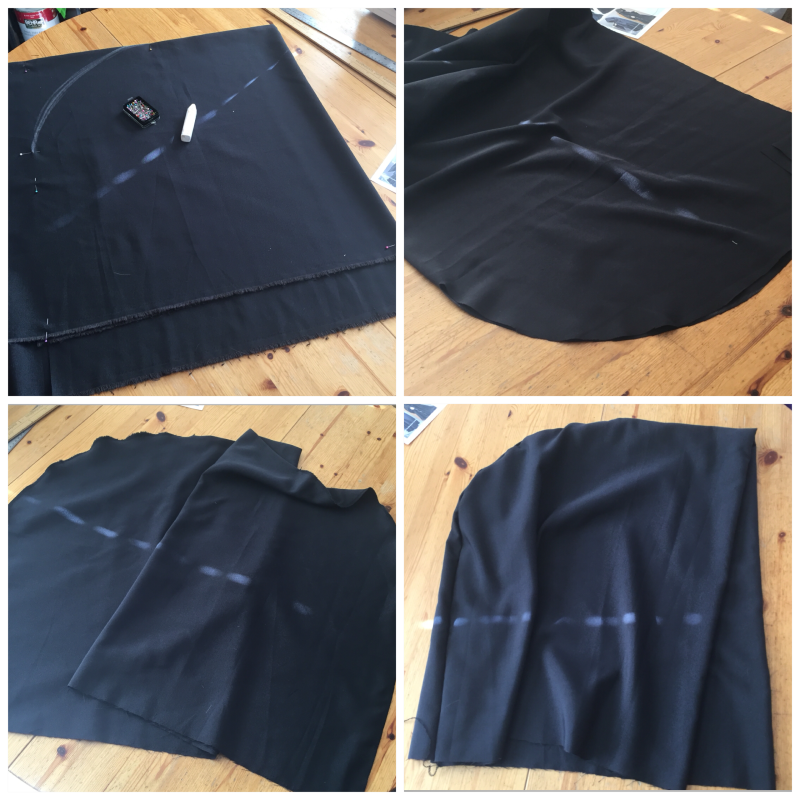
As you can see, I didn’t lay out my pattern “all at once” (I rarely do) – I cut out the body parts out first, on a fold… the sleeves second, also on a fold… and the hood third, on not one but TWO folds… Using a tape measure, then arc the “flared” edges of the robe so that you’ll have a consistent hem (see the pink lines: 58″-16″=42″… so, keep one side of the tape at the arm pit and arc along the bottom triangle with the other, end as in the diagram above).
With right sides together, Serge fronts (L & R) to back at shoulder seams. Lay out flat (front on top of back) and cut out neck using a plate/bowl (mine was ~25″ around). Serge the sleeves to the body, right sides together, matching the 2×16″ inside edge of each sleeve to the 2×16″ edge at the top of the body.
The hood is a bit trickier…
Open the oddly cut hood piece on both folds. With right sides together, fold along the TOP of the hood, so it looks like an upside-down “U” (instead of a puffy “V”). Serge along the curved edges (leave the flat part unsewn). Turn it “inside-out” (right side out, now) and take one corner of the flat edge and match it to the other corner – you should now have a “lined” hood.
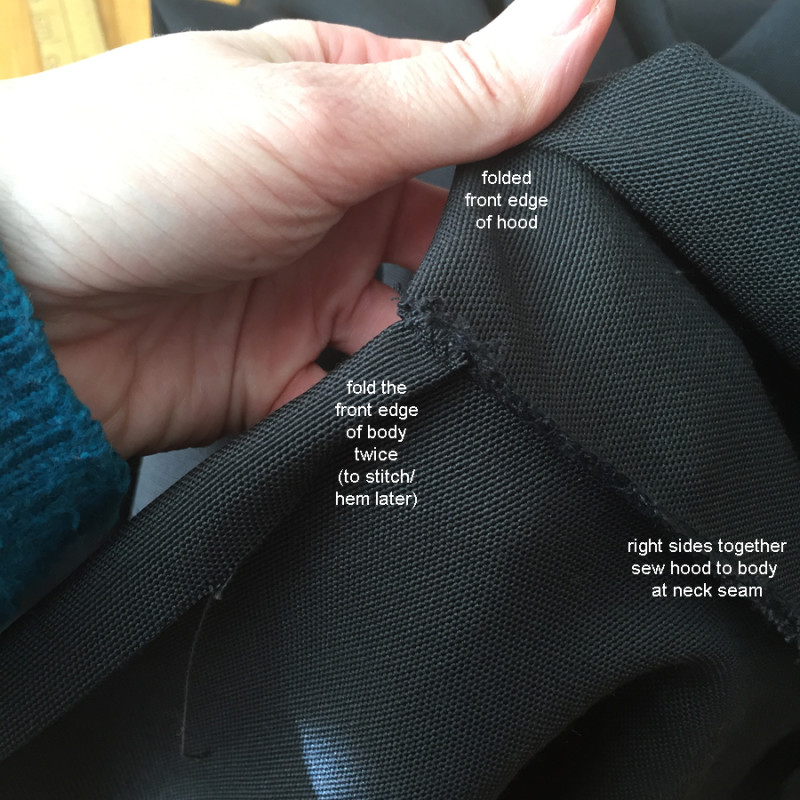
With right sides together (and a doubled hood), match the center back of the hood to the center back of the body. Pin in place. Match the front edges of the hood to the front edges of the robe, after turning the edge of the robe in for future finishing. Pin in place. (Below is a “later” photo to show this front edge detail. Do not sew the neck seam just yet.)
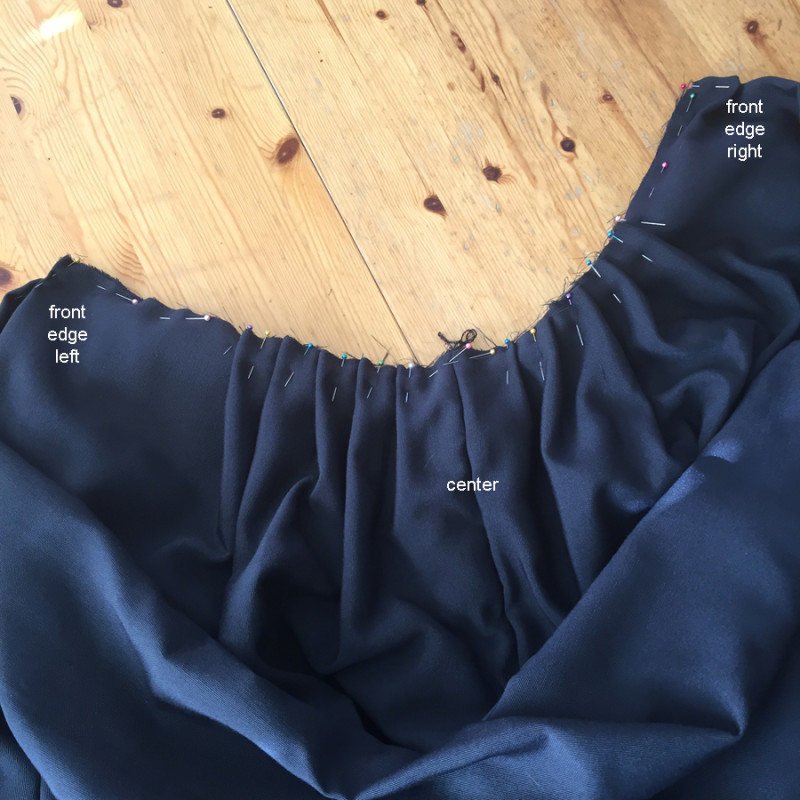
From front edges to shoulder seam, pin the hood to the body flat. From shoulder seam to center back, pleat the doubled hood so that it all fits in, and pin in place.
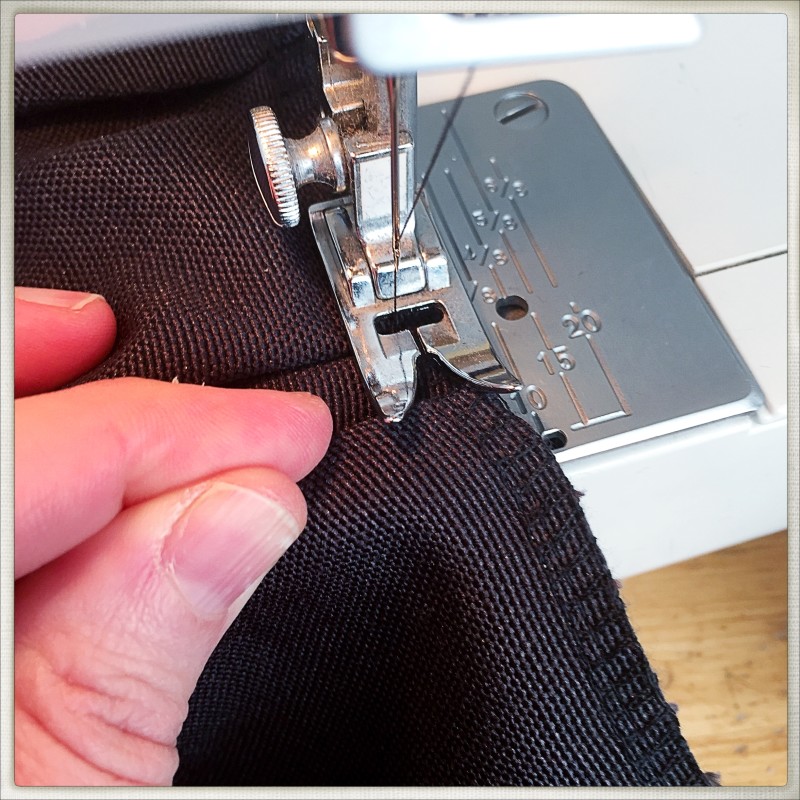
Then it’s time to Serge the hood to the body, from front edge left to front edge right. Then, with right sides together, Serge fronts to back, from the hand part of the sleeve up to the arm-pit, then down to the floor… for each side. Then all you have to do is finish the robe with a regular machine – stitch down the front hems, the sleeve hems, and the lower hem (I just double-folded about 1cm/1/4″ fabric for each of these and stitched in place). Finally, add some small pleats to the lower part of the sleeves, and stitch in place. Keep adding and measure as you go until the sleeves are the right length for you (I added 9 small pleats on each sleeve).
I also decided to make the neck seam a little neater by covering the Serged seam with bias tape… but it’s not necessary. Clasp at the neck, and voilà!
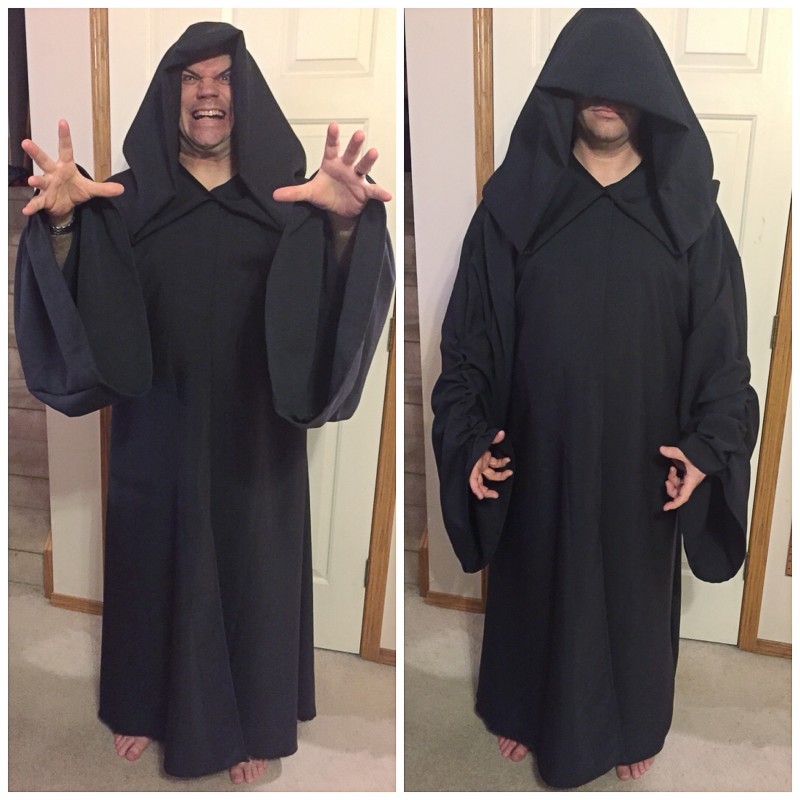
I got my husband to try it on… success! Looking pretty evil there, Honey. 😉 It may or not be 501st worthy (I don’t have the time to check that out), but it’s a good first attempt! =)
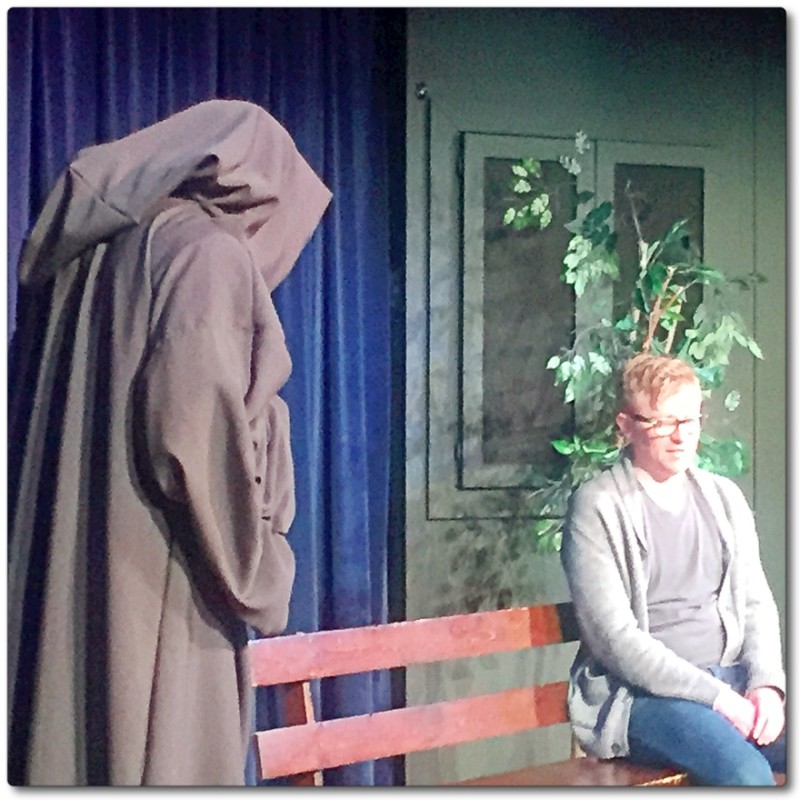
My husband brought the robe to Loose Moose Theatre to drop it off for Ken, and it even managed to get a little stage time. 😉 So… if you need an Emperor Palpatine robe, or even a more general “death” robe, or whatever… now you too can DIY yourself one. =) Happy stitching, y’all!

24 Replies to “Welcome To The Dark Side”
This turned out fantastic, Kate, and what a good sport your hubby is!!
Thanks, Lisa! =)
How much is the price on the robe
That would really depend on availability of fabric… which has been hit-or-miss since Covid.
K
what kind of fabric
It was an unknown/mixed fiber fabric from the discount bin, I believe…
How much is the emperor Palpatine robe I only have 20 dollars left
This robe is not for sale… and $20 wouldn’t even cover the vast amount of fabric used in this piece. Sorry.
Thank you, the measurements were very helpful. Nice detailed instructions and photos.
You are very welcome! =)
hi, I need information about this costume for me, can you send me the complete information please?
Everything I know is in the post. Links to other costume patterns… how I put mine together… I don’t know what else you might need.
I made mine from 2 sheets purchased from a thrift store for a total of $14. It turned out great !
Excellent pattern and great instructions, this was my first sewing project. I liked is so much that I may make a black and a brown version as well. This one is grey and a Santa hat and beard make for a perfect Gandalf costume.
That is AWESOME!!! I’d love to see them – do you have any photos posted anywhere???
May i ask the height of your husband? i want to make one for my hubby (he is 177cm tall, average weight). Your instruction and pattern looks great.
My husband is the same! So this should work out for yours as well!!! Send me a photo when you are finished – I’d love to see it! =)
How can I upload a photo here?
Got it done! Great help from your instructions.
I don’t think WordPress does that. Could you send it to kate@katewares.com? Please and thanks! I can’t wait to see!!! =) K
So I sewed this robe, well not this exact, changed it up a little. But took a lot of your tips and the pictures were helpful. However, a little difficult with the translation sometimes as I am from Sweden. But I think your description is among the best I found online. Thank you
Great job! I’m glad my post was helpful.
Hi! I am in a time crunch and here in the USA. I have a bunch of questions as I’m trying to make this for my nephew’s college movie shoot. I can not access the Rebel Legion pattern and am totally lost. Can I please connect with you directly for my many questions? Thank you for your help. I normally sew quilts with patterns and i am having a hard time visualizing some of your directions. Thank you -Cynthia
Sorry, Cynthia. We are experiencing technical issues with the site, as well as our own time crunch issues with my day job!
Also, was the length of the back of cloak 58″ or is that just the width of the piece of fabric you had? How could I adjust the measurments to fit a person who is 6’2″? On the hood, what is the 12″ x 12″ measurement for? Thanks in advance 🙂
I’ve emailed you directly.