Hostess Aprons DIY
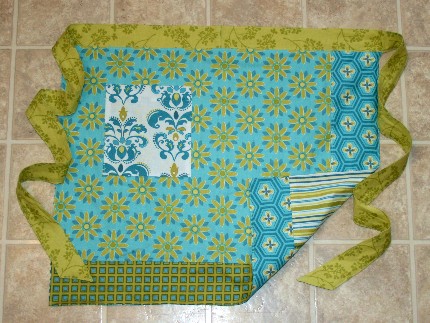
Okay. Well, with the exception of one outstanding Christmas package (wherever it may have ended up), all gifts have been received by now, and I will no longer be ruining any surprises by writing this post. So. Last year <ahem> I found some really cute fat quarters – at the Wal-Mart, of all places. Knowing that you should always take the opportunity when it is presented (as you may not get another chance), I picked them up and wondered what I would do with them after the fact. Then one day while browsing on Etsy, I saw some really cute “hostess aprons”… and then I put the two together and voila – I had just come up with some really cute Christmas gifts! When all was said and done, they ended up looking a little like this:

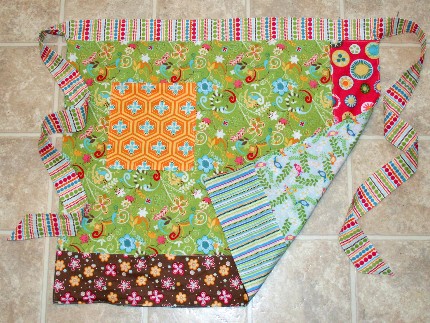
AND (because they were reversible) a little like this:

On the chance that some of you might be interested in making your very own fun little apron, here are the basic instructions. For each apron, you’ll need six coordinating fat quarters (which are pre-cut pieces of fabric, each measuring about 18″x22″). Wash, dry, and iron them, making sure to trim off the strings that come loose in the wash. Then play around with the pieces until you find a colour scheme that you really like.
You’ll need to decide which three pieces will be used for the Front Base, the Back Base, and the Waistband, and then the remaining three will be used for the Bottoms, Edges, and Pockets. Set aside the Bases and Waistband, and cut each of the other three pieces in half lengthwise. For each piece, cut one of the halves into half again lengthwise (giving you 2 – 1/4 pieces that you can use for edges/bottoms). Cut the other half into thirds widthwise (giving you 3 – 1/6 pieces that you can use for pockets). You will end up with 6 – 1/4 pieces and 9 – 1/6 pieces (of which you will only need 4 and 2 respectively, so try to only cut what you need and then you can save the leftovers for other projects). You can now take the piece you have chosen to be the Waistband and cut it into half lengthwise, and each half into half lengthwise again (giving you 4 – 1/4 pieces).

Then, it’s time to start sewing. With right-sides together and leaving a 5/8″ seam allowance, sew a 1/4 piece Bottom to one of the Bases lengthwise. Open and iron flat, then topstitch the seam allowance down to prevent fraying. Attach a 1/4 piece Side Edge the same way, except along the width/side per the diagram below. Keep in mind that some fat squares are not cut exactly to measurement, so you may have to trim some of the excess fabric along the edges to make it all line up squarely.

Now it’s time for a Pocket. As per the diagram below, take one of the 1/6 pieces for Pockets and make a 3/8″ Fold – A (along one of the short edges) with wrong sides together (#2). Iron in place. Then make a 1″ Fold – B with right sides together (#3). Stitch this fold down at 5/8″ from each side (C and D). Then, turn the resulting pouch inside-out, so that the right sides of it are now facing outward (#4). This will automatically give you 5/8″ folds along the sides. Add a final 5/8″ fold along the bottom and iron these in place. You can now stitch along the bottom of the pouch (which should be about an inch from the top of the Pocket now) to seal it shut. Then, pin the Pocket onto the apron wherever you want it to be, and topstitch it in place along the sides and bottom, leaving the top open.

Okay. Repeat this exact process with the second Base, trying to mix up which fabric you use for the Pocket, Bottom, and Edge. When you have two completed Base+Bottom+Edge+Pocket pieces (i.e. a Front and a Back), lay them with right sides together to make sure they are the same size. If they are not, you may have to trim some of the excess fabric. Finally, take your 4 – 1/4 Waistband pieces and stitch them together end to end to make one long piece. Find the middle of the top of the Front by folding it in half and line this middle-point up with the middle of your Waistband piece (with right sides together). Stitch the two together leaving a 5/8″ seam allowance. Open the Front +Waistband piece and topstitch the seam allowance down. Attach the Back to the opposite side of the Waistband in the same way. It should look something like this:

Now. Fold the Waistband in half so that the Front and Back lie with right sides together. Stitch together from point A to point B (and C to D) on each side, leaving the bottom open and clipping the corners. Turn the apron inside out. Fold-in a 5/8″ hem along the bottoms (front and back), line the two folds up (ironing if necessary), and topstitch together. Then you can topstitch along the rest of the apron edges to keep everything in place. Tah-dah! A reversible hostess apron that looks something like this:
Or maybe like this:
Sadly, I forgot to get a photo of myself wearing one of them before I wrapped them around some colourful spatulas and mailed them off. But, I managed to pick up some more fat squares and plan on making one for myself… eventually. Well, I hope that was easy enough to understand and that you have fun making one for yourself or a friend. Bon appetit!

7 Replies to “Hostess Aprons DIY”
Those are all so beautiful – great choice of colours! Great tute. You should post it to craftster.org, they would eat it up.
PS – I got the bestest one 😉
Teeheehee. I’m glad you like yours best. I hope everyone feels the same way. 😉
I’ll look into craftster.org… when I get a minute or two… one day.
=P K
Hi! I love your apron. In fact, I’m on the final step of creating my own. . I can’t figure out how to sew the band so that the seems won’t be showing. Do I sew it inside out? So far I have the front and back pieces attached to the waistband, but I can’t figure out what the next step is. I don’t know what “top stitching” means, so maybe that’s why. I’m a beginner sewer, and this has to be the coolest thing I have ever made 🙂 Please help me finish it!!
Nevermind! I think I figured it out. It looks so cool! I want to make more! Do you mind if I blog about it and give you all the credit for creating the pattern and link to your site? Let me know. I probably won’t do it until after Christmas, since I might give them away as gifts too!
Go for it! Glad you figured it all out and I’d love to see a photo of your finished piece!!! Hope you have a great holiday season! =) Kate
Yay!!!