Full-Length Aprons DIY
A while back, I posted a tutorial about how to make these fun, reversible hostess aprons using only fat quarters. Sew, sew, sewing!!!
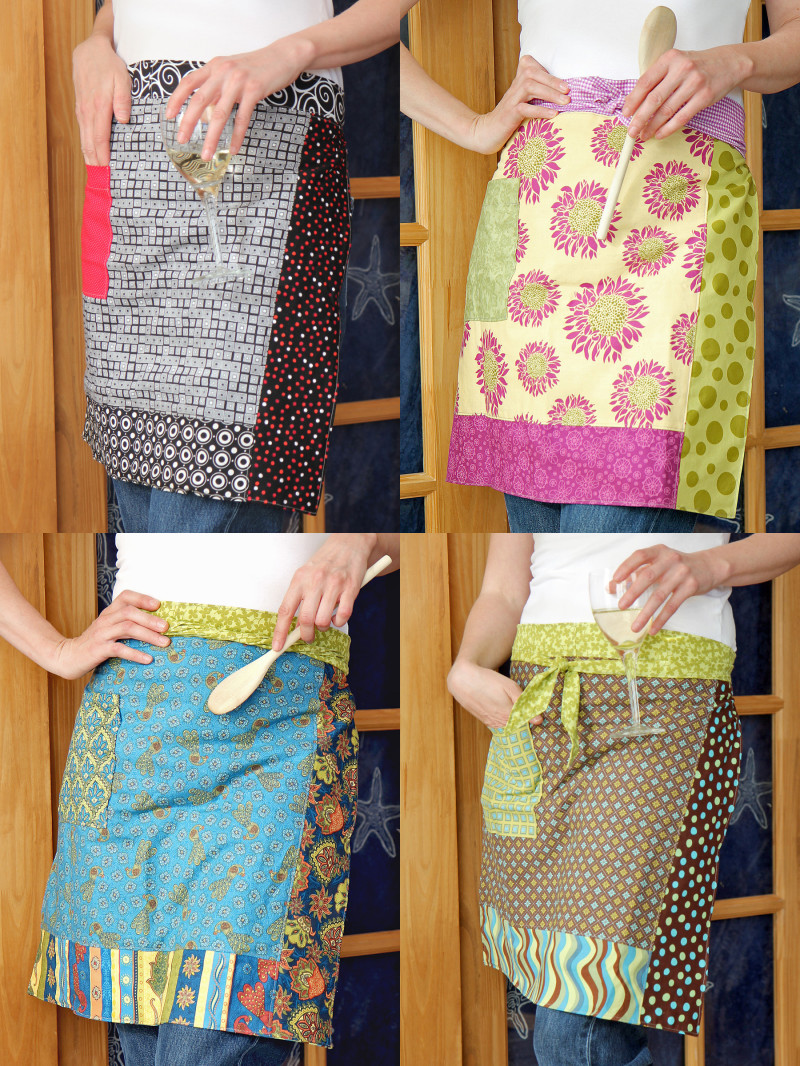
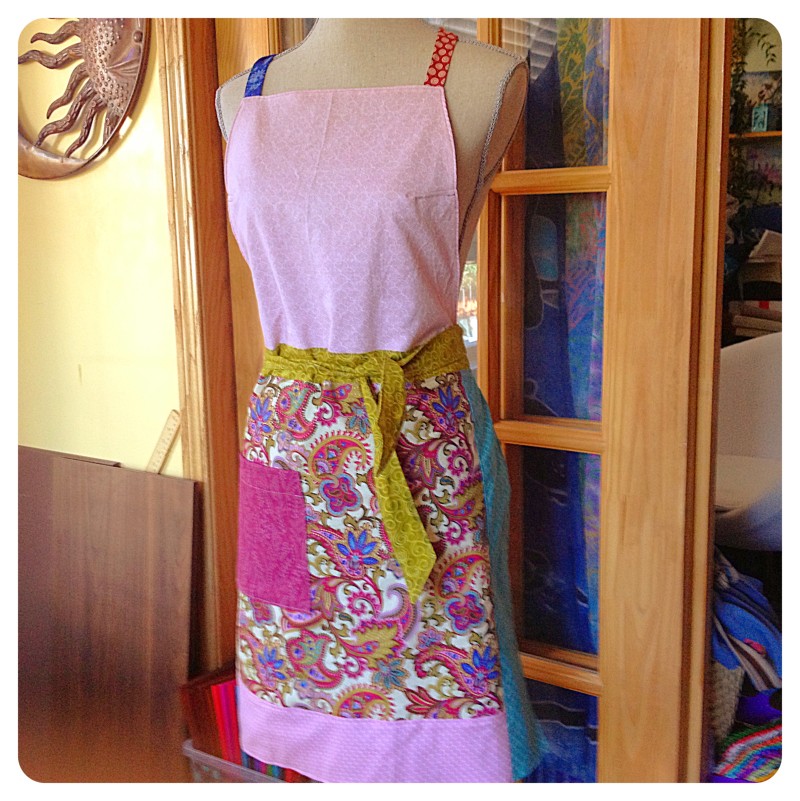
Since then, I’ve had a few people ask about full-length aprons, so I figured it was about time to give them a go. Still using fat quarters for the Front, and a bit of broadcloth for the Lining (i.e. the apron won’t be reversible, but I’m sure you could give that a try too), this is what I came up with.
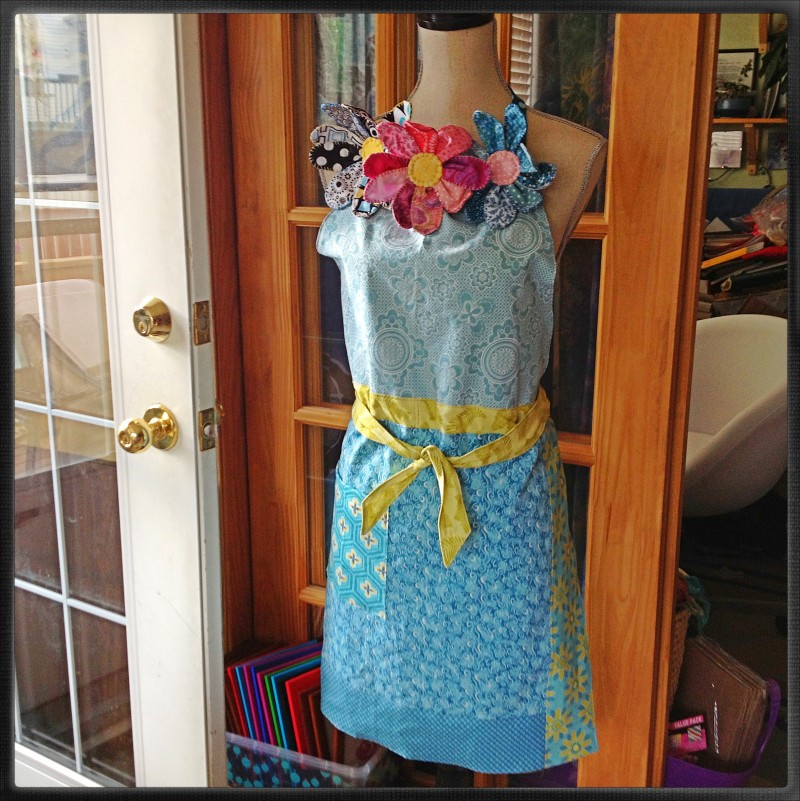
(FYI – The flowers were clipped on after the fact. The tutorial for them is here.)
If you’re interested in how to make this apron, here you go!
Full-Length Apron DIY Instructions
Again, you’ll need a minimum of 6 coordinating fat quarters (I used 8 total: 3 whole ones + parts of 5 other pieces for these aprons, but you could get by with 3+3 other pieces by having the upper Ties use the same fabrics as the lower 1/4 panels) AND 21″ of a coordinating broadcloth.
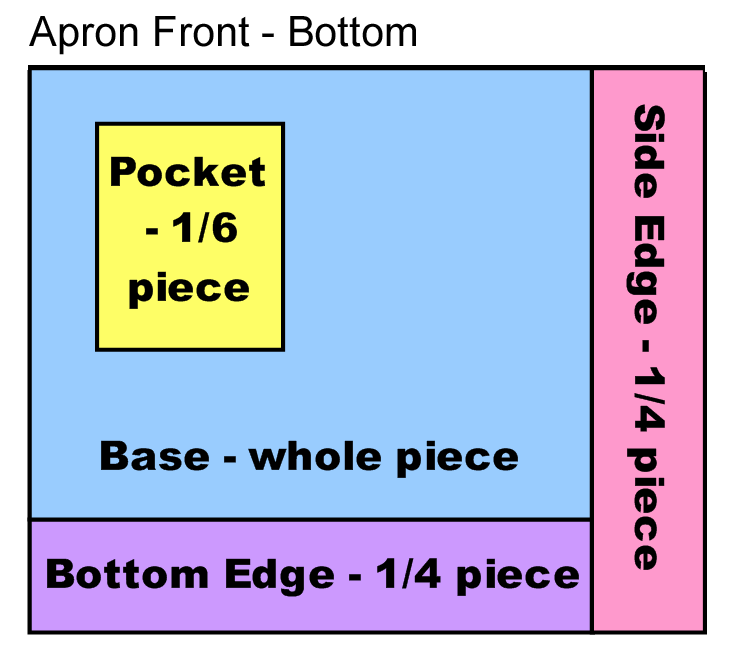
For the Bottom Front and Waistband, cut out these pieces from 5 of your fat quarters, according to instructions in the previous tutorial. (You will NOT need the Back Base or the other Pocket and 2 Edges…yet)
- 1 – whole Front Base
- 1 – cut into 4 x 1/4 strips for Waistband
- 1 – 1/6 Pocket
- 1 – 1/4 piece for Bottom Edge
- 1 – 1/4 piece for Side Edge
For the upper part, you will need 1* (if you repeat patterns for the ties, or 3 if you use unique pieces) other fat quarter(s):
- 1 – 1/8 piece (i.e. cut a 1/4 piece in half lengthwise, so it is a long, skinny strip) for Left Tie
- 1 – 1/8 piece (i.e. cut a 1/4 piece in half lengthwise, so it is a long, skinny strip) for Right Tie
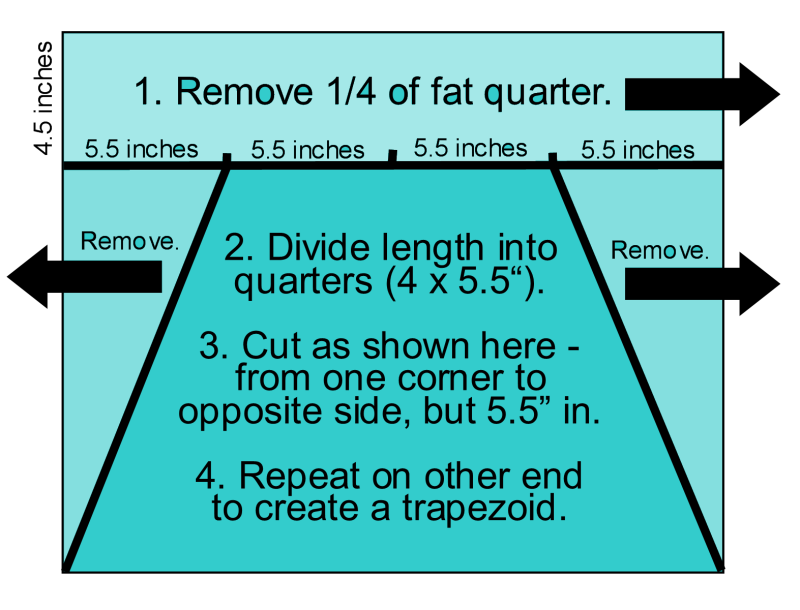
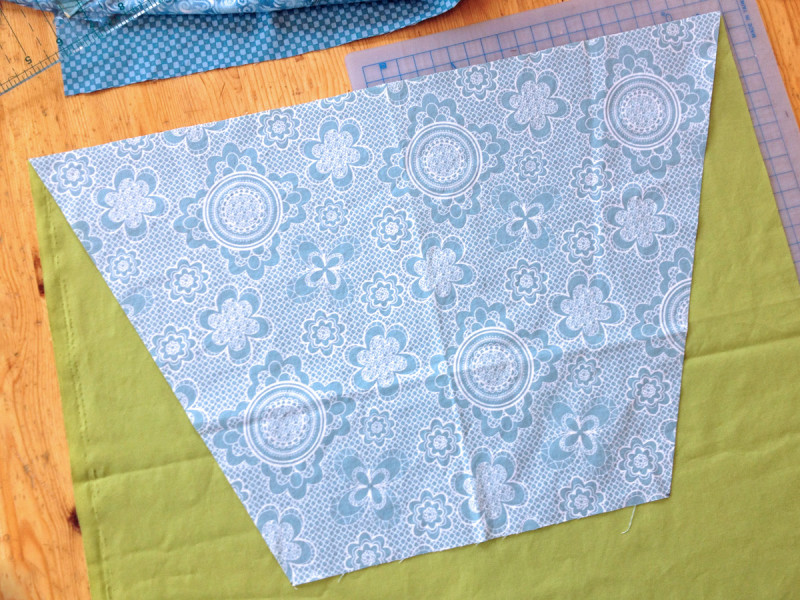
- 1 – 3/4 piece (i.e. remove only a 1/4 strip) cut into a trapezoid as per the diagram below for Top Front*
Before we get to cutting out the broadcloth, let’s get the lower half of the apron assembled, so you will know exactly how big we need to cut…
Following instructions in the previous tutorial, sew the Bottom Edge to the Base, then add the Side Edge to that piece, square off the results, and then add the finished pocket to the Base.
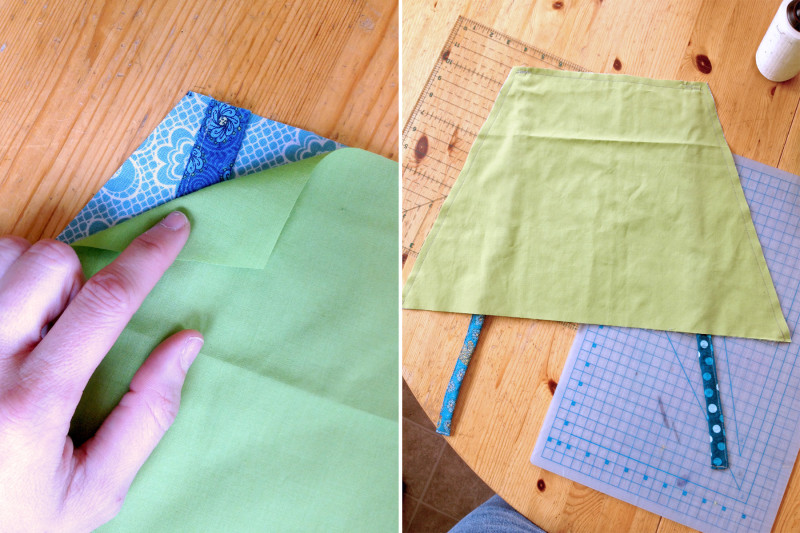
Okay. Now. Spread out your broadcloth and pin this Bottom Front piece along one of the edges (i.e. not right in the middle of the broadcloth) and then pin the Top Front (that you cut out previously) along the opposite edge so that they both fit. Cut along the edges of these two pieces to create two Lining pieces out of the broadcloth – Top Lining and Bottom Lining.
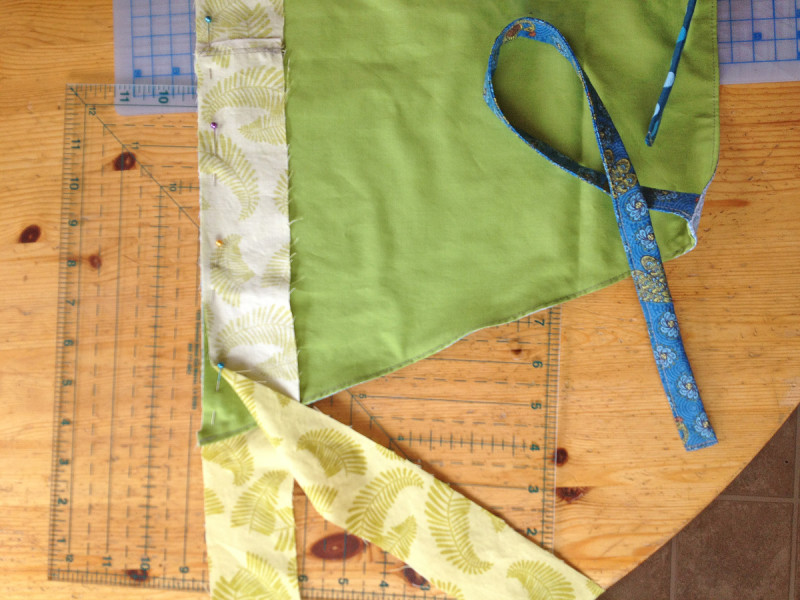
Next, take the fat quarter for the Waistband and if you haven’t yet, cut it into 1/4-s lengthwise to get 4 – 1/4 pieces. Then, cut these 4 pieces in half again, for a total of 8 – 1/8 strips (22″ long and 2.25″ wide).
You will also need an additional two – 1/8 strips for the Ties, so pillage your fat quarter 1/4’s and cut accordingly.
For the Waistband: stitch the 1/8 pieces together end-to-end, right-sides together, so that you have two LONG strips of 4 x 1/8’s. (Kind of like in the previous tutorial, except your Waistband is only half as wide… but there are two of them now.)
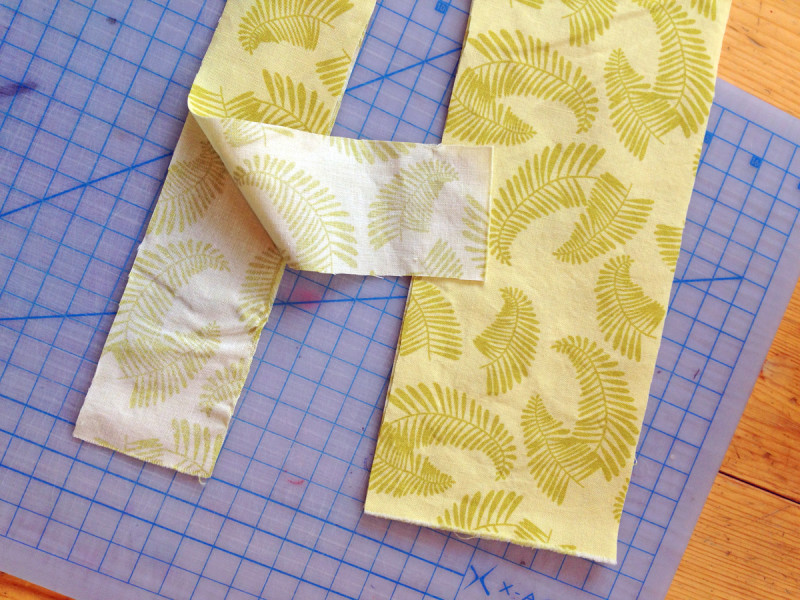
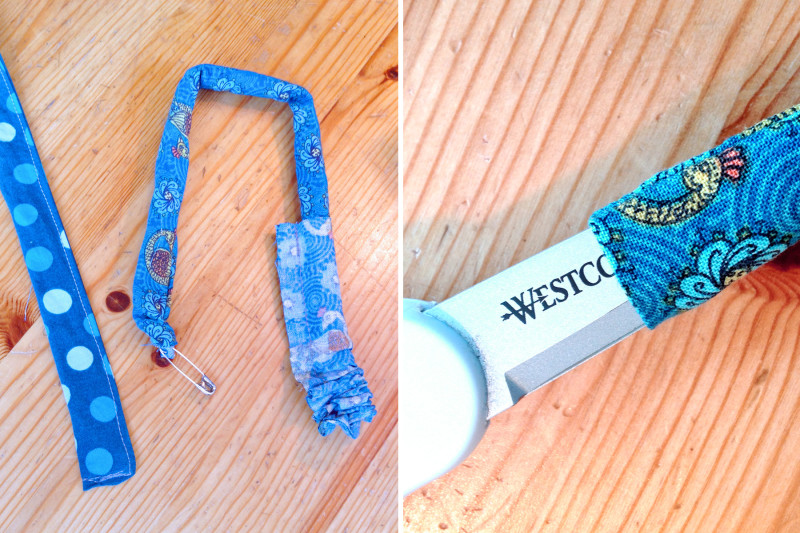
For the Ties: fold each 1/8 piece in half lengthwise, right-sides together, and stitch along the long edge – leave the ends open. Turn these two tubes right-side-OUT using a safety pin. Then, using something small (like a pencil or scissors), tuck one end back in so it looks neat and tidy, and topstitch to seal it and secure the side, as in the below images.
Then, you need to attach the Ties and Waistband to the Top…
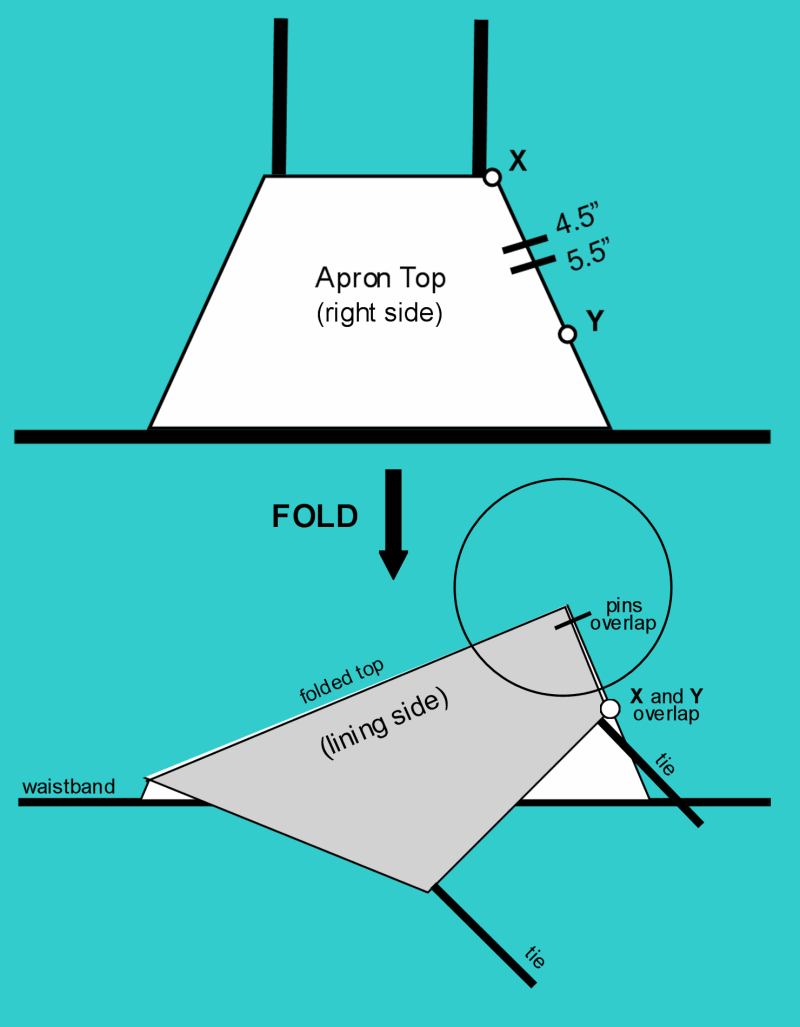
Overlap the Top Front and Top Lining with right-sides together. Peel away the upper corner on one side, and slide in a Tie with the open end along the upper edge, and the finished part between the two pieces. Pin it in place between the two layers, and do the same with the other Tie on the other side. Stitch along the 3 shorter edges of the Top, leaving the longest edge open, as per the image below. You may want to double-stitch over the Ties to reinforce them.
Turn the Top right-side-out and topstitch along the three shorter sides.
Place one Waistband strip, right-side up, on the table and find the middle of it (i.e. two 1/8’s on each side). Fold the long (unstitched) end of the Top in half and mark it (the middle) with a pin. Put the right-side of the Top on the right-side of the Waistband, matching middles. Line the Waistband up along this long end (i.e. ties are on the opposite side) and pin it in place – there will be lots of Waistband left over on either side. Do the same with the second long strip, so that the two Waistband strips are facing each other, right-sides together, with the Top sandwiched between them. (You can remove the pins from the first Waistband strip and pin all the layers together now). See below.
Now. Stitch along where these pins are with about 1/4″ seam allowance if you can (so your waistband doesn’t get too skinny), stitching the two Waistband strips to the Top piece at this long (non-ties) edge. Extend this stitching along the length of the Waistband strips (both sides) – so that it will eventually act like one long, wide Waistband, as in the previous tutorial.
Okay. Now. Open up the Waistband so that the Top Front is facing up (see below). Fold the Bottom Front in half lengthwise to find its center, and line that up with the center of the waistband, and pin along the edge. You should only have two layers of fabric – one of the Waistband and one of the Bottom Front (NOT the Bottom Edge side, though – the Base + Side Edge part). Stitch the Bottom Front to the Waistband.

Flip the whole shebang over and do the same with the Bottom Liner. The side edges of the Bottom Liner should match up with the side edges of the Bottom Front, and when you hold up the piece by the center, the bottoms should match up as well.
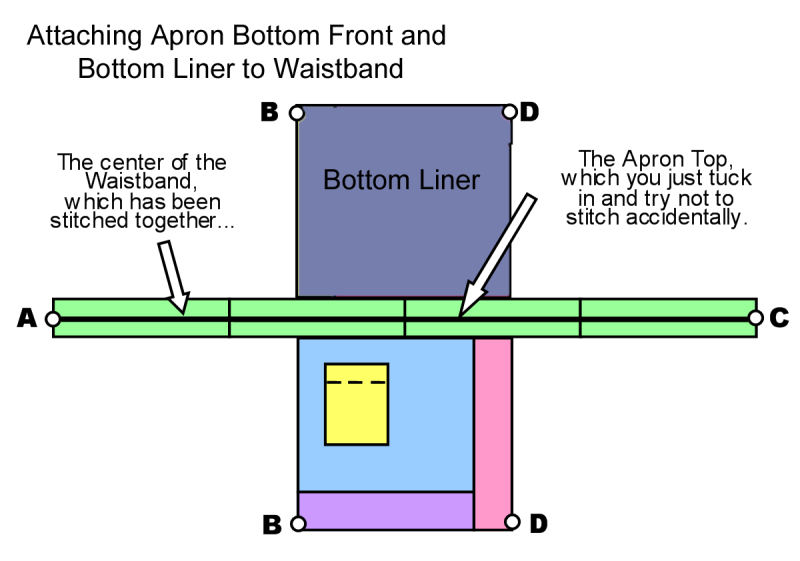
You are going to finish the apron pretty much the same as in the previous tutorial, except that the Top has been sandwiched in the middle of the Waistband. Just try to scootch it out of the way when you are stitching it all together (folded at Center line and stitching A to B and C to D)… and follow the directions in the previous tutorial from about the above diagram (which has been slightly altered for clarity).
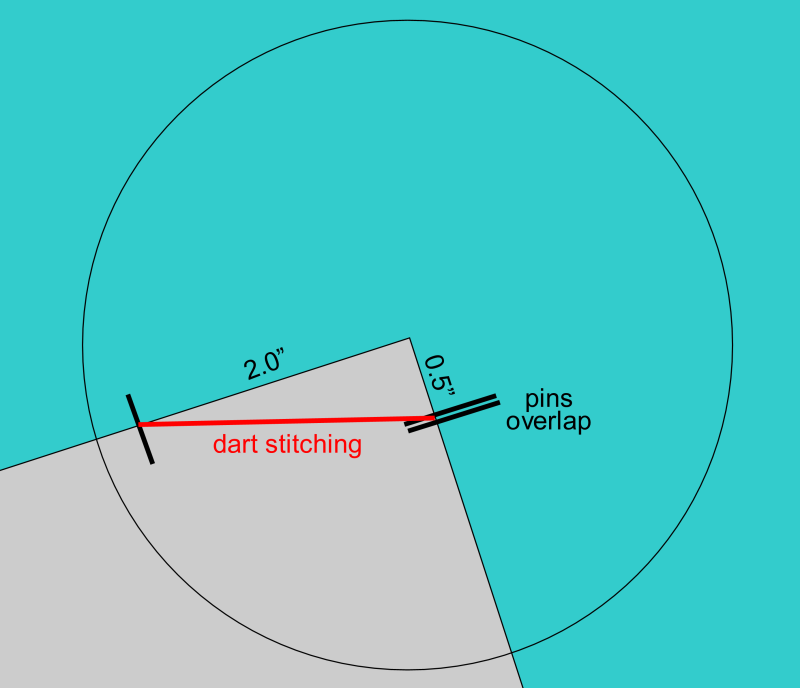
To finish off the apron, and make it fit a little more nicely, you may want to add darts to the Top. Measuring along one angled side of the Top, from the Tie towards the Waistband, mark with pins at 4.5″ and 5.5″. Fold the Top with right-sides together to match these pins (and X to Y, in the diagram), and mark 2″ with a pin along that fold. Stitch from pin to pins, as in the diagrams below. Open up and topstitch in place. Repeat on the other side.
Expanded view of circle area:
And, voila. Full-length apron using only 6 fat-quarters (plus some lining). =)
Whew. Well, I hope that made sense. Let me know if you give it a try. Cheers! =)

One Reply to “Full-Length Aprons DIY”
These are beautiful, Kate!
Thank you so much for sharing the how-to here!