From Rags To Rugs
As you may know, I love to knit and crochet. One of my favourite items being these cute and colourful cotton wash cloths – perfect for either dishes, or your pretty little face. 😉
But recently, after seeing some cool images for rag rugs on Pinterest…
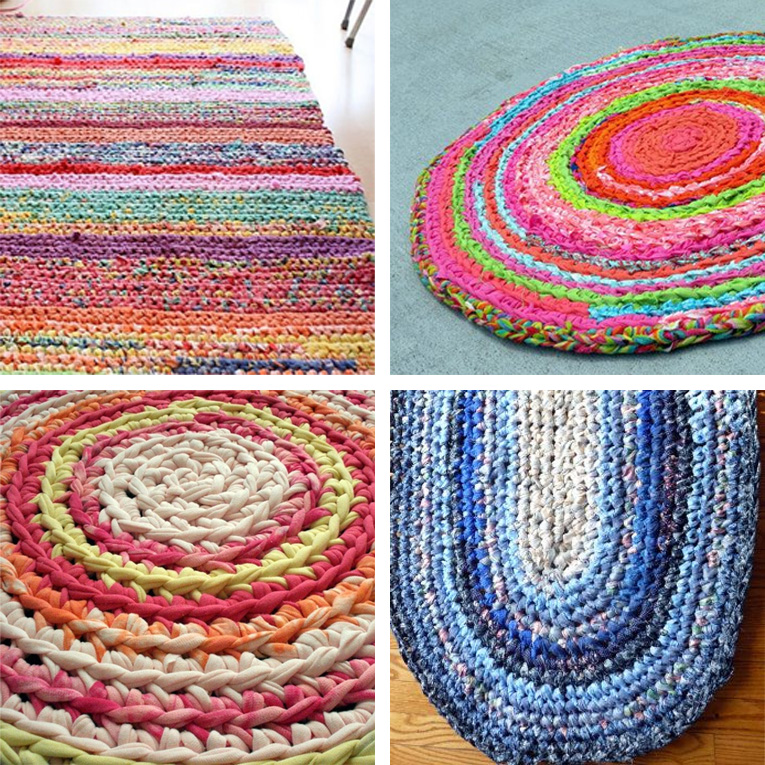
… and then seeing the one that the amazing Lori Degenstien made …
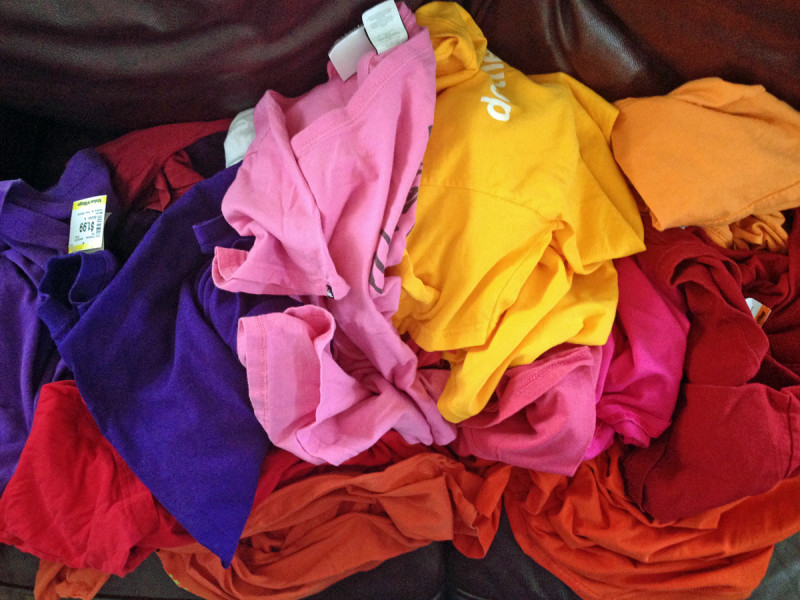
… I got inspired to make one myself! Luckily, last weekend we found ourselves out and about in the NE part of town, by chance ending up at a large thrift store (Value Village). While some of the L and XL mens tees were going for upwards of $15!!! (for SECOND-HAND tees! INSANITY!!!), I managed to find a bunch of colourful ones for $2 or $3. Coupled with a few of my husband’s old tees, and I was ready to start!
Now. If you’re wanting to try this kind of project for yourself, look for the biggest tees you can find. The ones without seams along the sides are best (i.e. they’re tubes, essentially), as are those without anything on them (free of pockets, decals, zippers, etc.). But if you’re not up to making your own rug you can purchase beautiful rugs at https://www.southwesternrugsdepot.com/decor/.
HOWEVER. You can totally work around those things, so don’t freak out if you can’t find “perfect” tees. It drives me crazy that some people buy tees, and then cut off the bottom 1/2 (i.e. the part free of decals) for their project, and throw away the rest!!! What a waste! I like to be as “green” as I can, so I used pretty much ALL parts of the tees – including the decal/slightly stained parts, and the parts with seams!!! I’ve included a tutorial below on how to cut them to make the best use of the tees if you’re interested. If not, feel free to scroll all the way to the bottom for the finished project. =)
Making “Yarn” From Tees
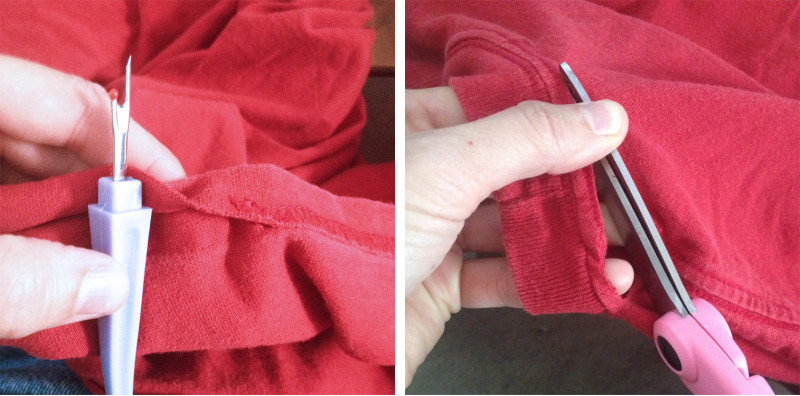
To get the most from your tees, use a seam ripper and take off the bottom and cuff hems – and pockets if there are any. (Or, if you can’t be bothered with that, you can always cut hems off too.) Remove the neck band as well (I saved mine for possible use on the iCarly tees that I sometimes make…)
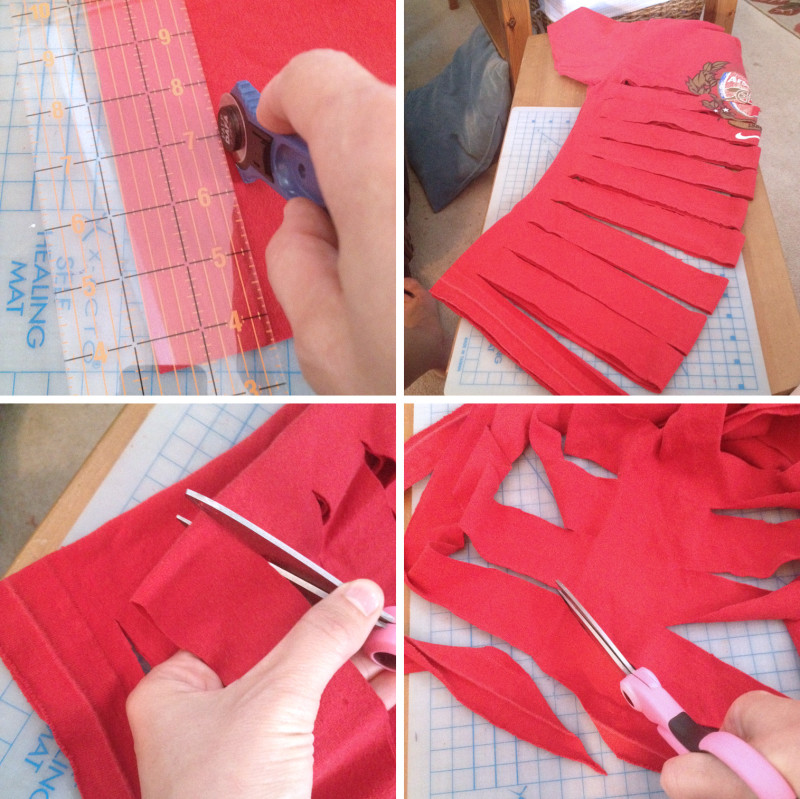
Fold your tee in half lengthwise, side-to-side and armpit-to-armpit, and flatten. Using scissors or a rotary tool and ruler, make 1″-2″ strips, cutting from the folded middle to within about an inch of the edges (strip width depends on how thick you want your final yarn to be – I went with 1.75″). Do this up to (but not past) the armpit of the shirt. Lift the top half layer off of the bottom half, and clip all the way through the ends following your original cuts. Then, open up the tee along the edge that hasn’t been cut. Lay it out flat and cut diagonally from the end of one cut to the beginning of another, such that you make one very long strip of fabric with the bottom of the tee (see above). Most people would stop here, but not us!!! Set aside that cut strip and find where it joins back with the tee. Lay flat, as seen below.
You’re eventually wanting to open up the top part of the tee, flatten it out in one layer with the neck in the middle, and have it be an oval that you can cut around into a strip… So. First, you are going to continue your last outside cut line so that it goes across the armhole seam and curves around… and joins up with the bottom of the sleeve, as seen above. Be careful not to cut through both layers of the tee at this point.

Then. Unfold and flatten that side of the shirt, and continue cutting your outside curve so that it rejoins with the bottom on the other side of the shirt (trimming off the armpit seams, essentially). Once the outside of the arm is a curve, start cutting the inside curve so that you continue making your strip of fabric – I used my fingers to measure approximately how wide the strip should be. Continue to the other side of the tee and repeat the process so that you’re now, essentially, cutting around an oval!
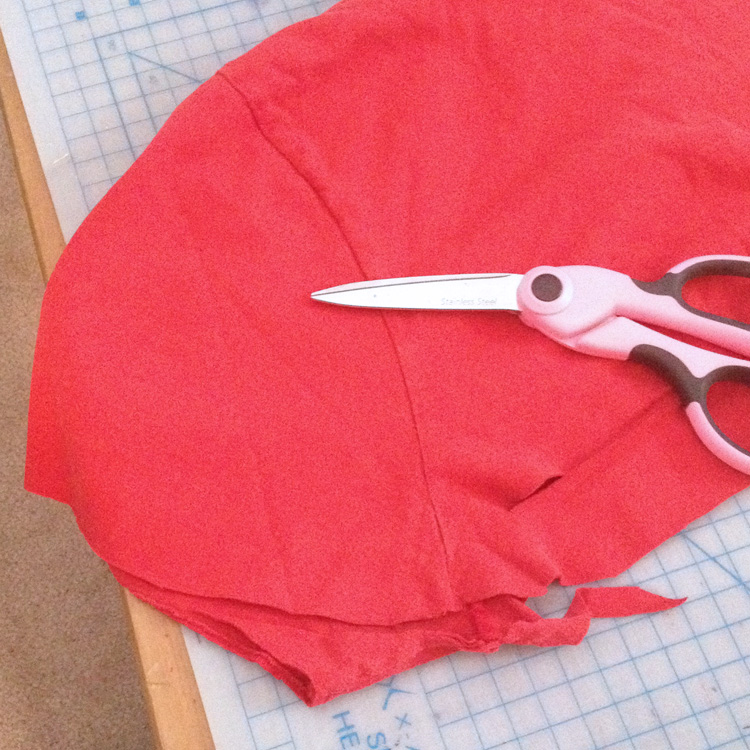
Continue cutting around and around until the sleeve pieces are too small to make a cut within (i.e. you’d have a long shoulder seam in your strip, which you don’t want). Before your inside cut gets there… trim off the tips of the sleeves, re-making your oval just a little bit smaller (see bottom right photo). Continue cutting around and around… until you run out of fabric, essentially. You’ll end up with a bit of extra left over from the back of the tee, but that’s okay. You’ve used probably 95% of the tee, so don’t feel too bad!
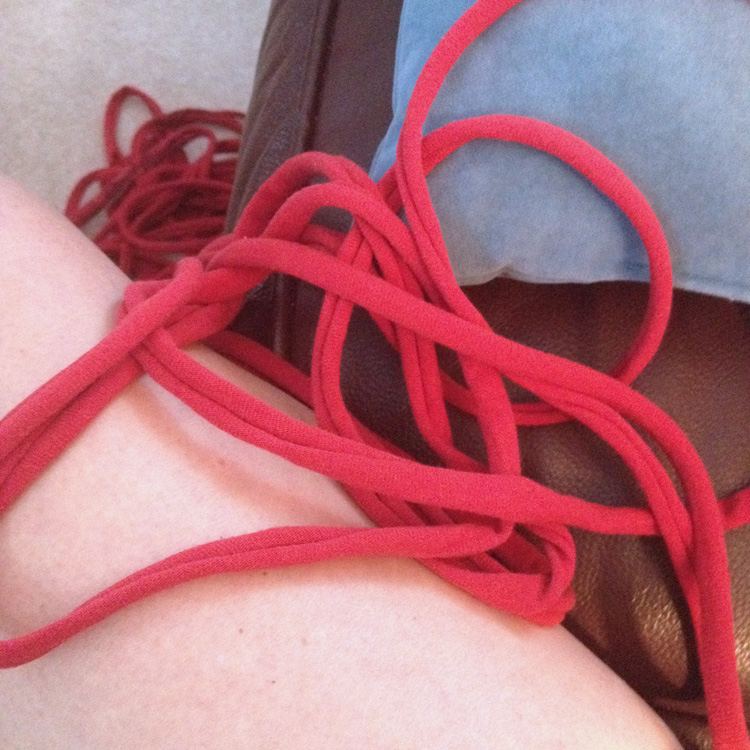
Once you have finished cutting, it’s time to stretch your strip. Simply pull the tee fabric between both hands, all along the length of your strip. It should curl as in the above photo… BUT. In the places where you’ve curved around the top oval, or where there is a decal, it may not. Don’t worry about it for now. Once you get to the end of stretching, wind it up into a ball and get to work on the next tee!
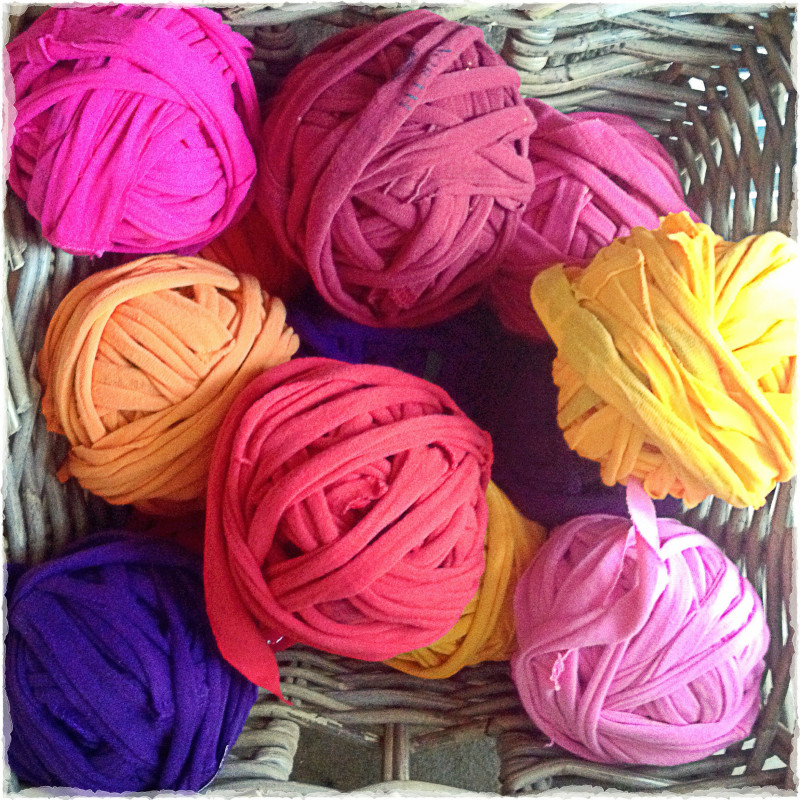
Try to get colours that go together nicely, rather than a hodgepodge. For a 3′ diameter rug, I used about 15 mens L and XL tees, I think.
Crocheting A Rag Rug
You can find patterns like this on the web… but I really think you will have to constantly adjust them depending on (1) the size of your hook – I went with a 10mm/US#15, (2) the stretchiness of your tees, and (3) your tension. Just remember, if it starts to get all wavy, you’ve added too many stitches (so go back, and don’t add as many) and if it curls up into a “cup”, you’ve added too few (so go back, and add a few more). My pattern (all in single crochet) went something like:
- Round 1: start with 6 sc stitches in a centre ring
- Rounds 2&3: slip stitch up a layer, then add 2sc stitches on every one on the layer below
- Rounds 4&5: slip stitch up a layer, *sc sc 2sc, repeat from *
- Rounds 6-14: slip stitch up a layer, and add 2sc every 4or 6 or 8 or 10 stitches… I pulled out, restitched, and experimented SO many times, trying to keep my piece flat, that I TOTALLY lost track of what worked!!!
- Rounds 15+: slip stitch up a layer, * sc 15 stitches, then 2sc… repeat from *
BUT NOTE – once you get into Rounds 6 and up, you’re going to want to stagger where you start your 2sc pattern from. If you constantly 2sc in the same place, you’re going to end up with a polygon rather than a circle… But if you’re making your own yarn, and can read the above pattern, I’m pretty sure you’re advanced enough that you can figure it all out. =)
Hints For Crocheting With T-shirt “Yarn”
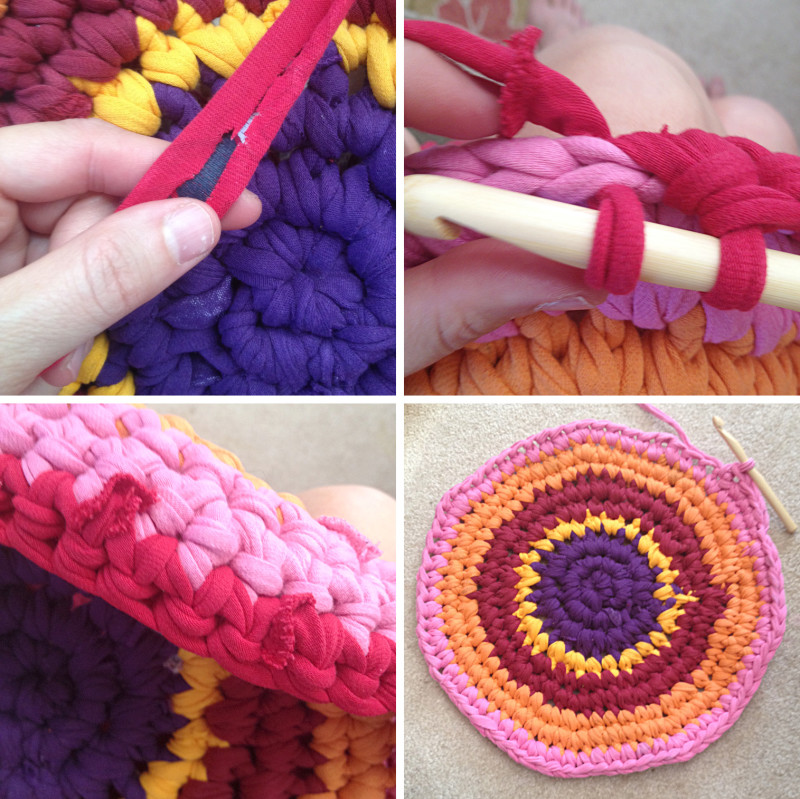
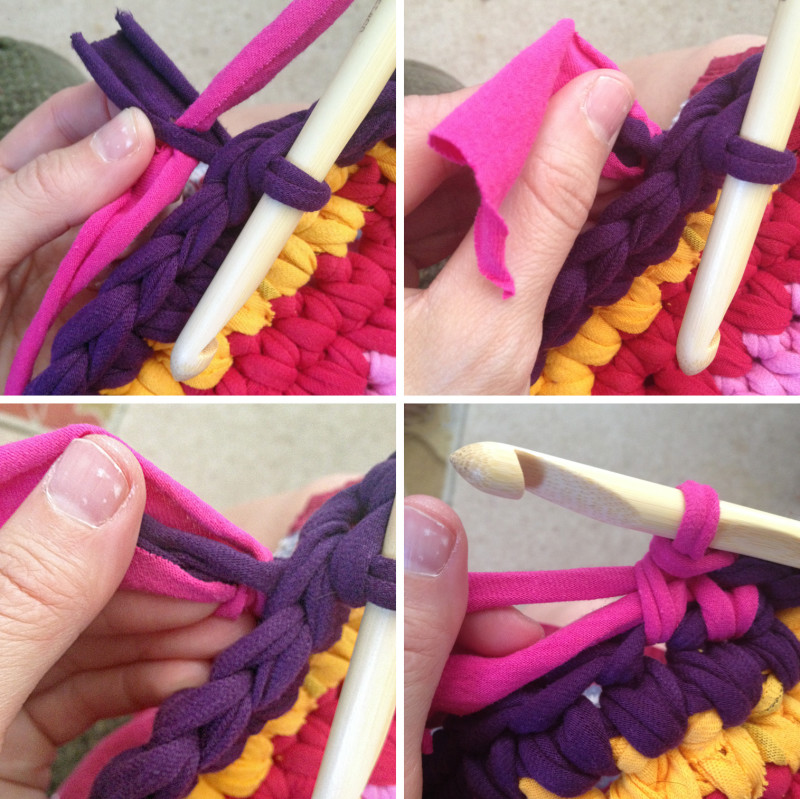
So. You’ve used most of the tee. Which means your yarn is going to have a couple of… issues (see above). Like (A) the decals. If the yarn doesn’t naturally curl around them to hide them, all you have to do is fold them edges-to-centre and then in half so that the fabric covers them. You may have to twist a bit to get it to stay that way until you’ve stitched with it. But easy-peasy. You may get some decals that show a little bit through the fabric, but remember, it’s a “RAG” rug!!! Second issue, (B) seams. If you’ve gotten a tee with side seams, and if you use the top part of the tee like I did, you are going to end up with seams that will make the rug look messier if you just stitch with them straight. What I did was every time a seam came up in the yarn, I would pull the yarn through only up to the seam – leaving the bulk on the back side of the rug. Sometimes this meant I would have to take out 3 or 4 stitches and adjust my tension (tighter or looser) so that I could do this successfully, but I could always make it work. My rug looks neat and tidy (on one side, at least – like most rugs). If you’d like both sides to be equally tidy, you’ll have to wind the fabric around the seams, kinda like with the decals, I think…
And just a quick note on hiding ends/changing colours… I simply crocheted over them! As I was making my first 6 sc in the ring, I stitched over the initial “tail” to hide it – no need to “weave it in” later. To change colours (see above): trim the last of your current yarn to about 1.5″ from the rug. Make a small hole in the middle of the tail, close to the rug. Insert your new colour through the hole, and wrap the new tee yarn around the old tail. Hold this doubled tail (new colour on the outside) along the stitches of the rug, and start crocheting with the new yarn, making your stitches go around the ends to secure them to the stitches below. All you have to weave, then, is the very last tail when you are done!
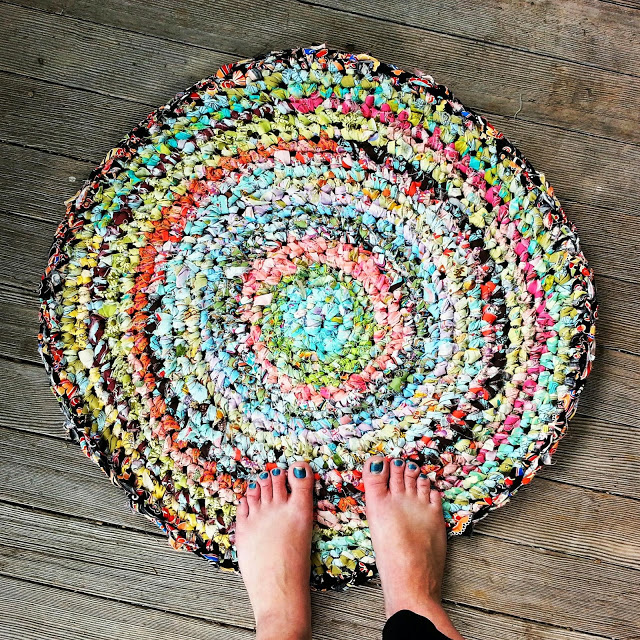
And what does it all look like when you’re done? Something like this:
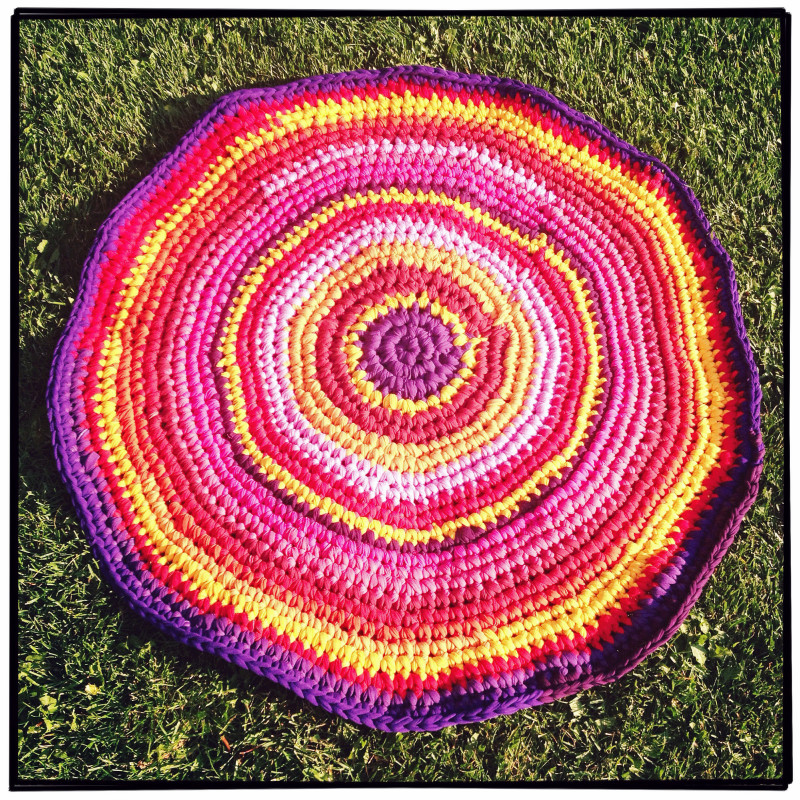
No, it’s not perfectly flat (I’m still working on my technique/pattern). Yes, you can still see a bit of decal showing thorough in spots (but not unless you’re really looking for it). And yes, it’s heavy (about 5.5lbs for a 3′ diameter rug, which makes me wonder how I will best be washing the thing)… But my kids are already fighting over it, and I’m excited for my second attempt! Not a bad deal for $20 worth of second-hand tees!
Well, I hope this has inspired you to give it a go, or give something a go – even if an entire rug is too daunting, you could always start with a simple pot holder! You’ll never know until you try. Anyhow. Hope your summer is going well! Happy stitching, y’all! =)

4 Replies to “From Rags To Rugs”
I love this! HOw much time did it take you from cutting/seam ripping to completion? Also, can it be washed, and how? I’m dying for a new option for front entry way that’s colourful and washable, but rugs are freaking expensive!! This might be a solution?
I think it took about 3 days from start to finish for me – with the constant interruptions you get with kids – but I was focused. 😉 A few good pockets of time get you far, once you get “into the zone”, but I figure it’s a great “work on it when you get a few minutes” kind of craft.
As for cleaning – I imagine it can just go into the washer and dryer, as they are all old tees… but I find the circle is an awkward shape. And it’s kinda heavy as it is – it’ll be even heavier soaking wet… so cleaning will be an adventure, indeed!
Oh my goodness, Kate, what a great post and tutorial.
Everything here is so beautiful, and I just love the tee shirt yarn.
What a neat idea!!
Have a great weekend, my friend! xo.
Thanks, Lisa! Have a wonderful weekend yourself! xo